Safety in a skin on fram kayak
By Anders Thygesen.
Canvas kayaks are excellent craft! That's my opinion, at least, and I both build and paddle them. I prefer to build them according to traditional Inuit design, which work excellently after thousands of years of testing in the world's harshest conditions. After all, what experience does a Norwegian recreational paddler have compared to the vocational kayakers of the past? Since they were professional, they had other conditions for determining "safe" paddling than what we have when we occasionally go paddling. The eskimo roll was developed and used as a consequence of low water temperatures and the fact that almost none of the Inuits could swim. If they fell out of the kayak, they were literally dead in the water. We will never be quite as proficient as they were, and we base our safety on other rescue techniques if we're unlucky enough to capsize. In the following paragraphs, I will cover bouyancy, rigging and trim with regard to canvas kayaks. All of these pointers can also be applied, more generally, to any kayak initially without bulkheads, deck rigging or rudder.
Buoyancy and the seasock
Buoyancy is the most important factor. A frame-and-skin kayak filled with water will float because of the wooden frame. However, if it's filled with heavy luggage, it may sink if filled entirely with water. Once a kayak has been filled with water, it will be very hard to empty, luggage or no luggage. Therefore you should provide it with more buoyancy. This can be done with empty jerrycans, tire tubes, or waterproof nylon bags with valves for manual inflation. It is also possible to acquire buoyancy bags to pack your luggage in. Normal watertight packing bags, for e.g. clothing, will provide buoyancy if you leave some air in them and don't pack them too tightly. In addition to the kayak being buoyant in itself, the sea sock is a splendid way to solve the entire buoyancy problem. A sea sock is a bag of waterproof material placed in the cockpit and attached to the cockpit coaming. This prevents most water from entering the kayak upon capsizing, and makes bailing very easy. Additionally, the sea sock prevents sand or dirt from getting into the kayak, and works as an insulator on cold days. If you paddle a kayak without a sea sock, make sure to stay near land! The sea sock is an essential part of a safe kayak.
Deck rigging and self-rescue
The deck rigging provides safety and is, like the sea sock, necessary if you intend to use the kayak anywhere but in the most sheltered areas. The most important part of the deck rigging is that which allows you to attach the paddle as an outrigger. You will need to use strong rope and solid wood tighteners. The rope should be adjusted so that it's easy to shove the paddle under, and easy to tighten – not too loose and not too tight. Test it for yourself. Also, you should have crossing ropes at each end of the kayak. This is to keep a spare paddle in place. You should normally have a spare paddle at hand for self-rescue. Alternately, you can make a paddlefloat, but the spare paddle is safest, as by having a paddle outrigger on each side of the kayak, you can avoid falling over to the side with no support (the most common mistake when using paddle outriggers) when re-entering the kayak from the water. Ropes that run the length of the kayak are also an advantage so that you can easier grab hold of the kayak if you are lying in the water alongside it, or if a swimmer is going to hang onto the kayak. Such ropes are easy to set up, and can also be reconfigured as a tow or docking rope. To attach these ropes, you should hook two small loops of rope around the ends of the kayak. Use e.g. a thin nylon line running along the kayak.

Trimming the kayak
To "trim" a kayak means to make it handle well in wind and waves. You should learn this in order to get as much enjoyment from your paddle trips as possible, and to retain maximal control. Distribution of weight: Later I'll talk about trimming your kayak by packing your luggage. However, this is not a very good solution, as the kayak is designed to balance its weight around the middle from the outset. When you pack your kayak, you should have about as much weight behind as in front of you. The heaviest items should be near the middle, and the lightest things near the ends. This also ensures that the kayak flexes gently with the waves.
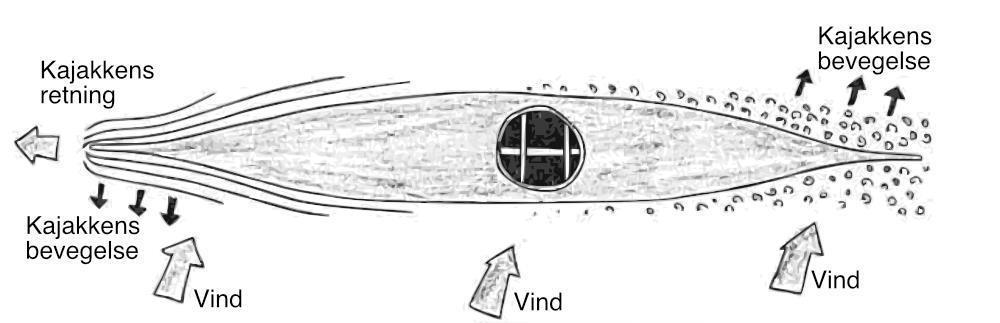
Trimming and side winds: When you're paddling and the wind comes from the side, you may notice that the kayak tries to orient itself with the tip towards the wind. When this occurs, we say that the kayak is weather cocking. It's not actually correct to say that the kayaks turns towards the source of the wind, because what really happens is that it falls off at the stern. This is because when you paddle, the bow gets caught in a laminar flow that arises along the sides of the hull as the kayak split the water. Behind the center of the kayak, the water will be turbulent, and the kayak will cleave less well to this water.
Weathercocking
When the wind blows from the side, it will have a greater effect on the rear end of the kayak, and it will feel as though the kayak is turning into the wind. One can do the following to avoid the problem:
- Pack heavier luggage at the back of the kayak.
- Move yourself further backwards.
- Make the front deck catch more wind, for example by packing luggage on the front deck instead of the aft deck.
- Move the paddle windwards in your hands, or paddle stronger on the windward side.
- Lean into the wind.
- Use the paddle as a rudder.
- Attach a rudder or skeg.
Steering devices
Pedal-steered rudders are commonly used on plastic and fibreglass kayaks. However, pedals are very hard to install in a canvas kayak while keeping it fully watertight. If you plan to use a rudder, the rudder should be steered above deck, with a rope, and the rudder is then used more for staying on course than as a steering mechanism. (For more on this, see the Norwegian magazine "Padling", issue 2, 2002.)
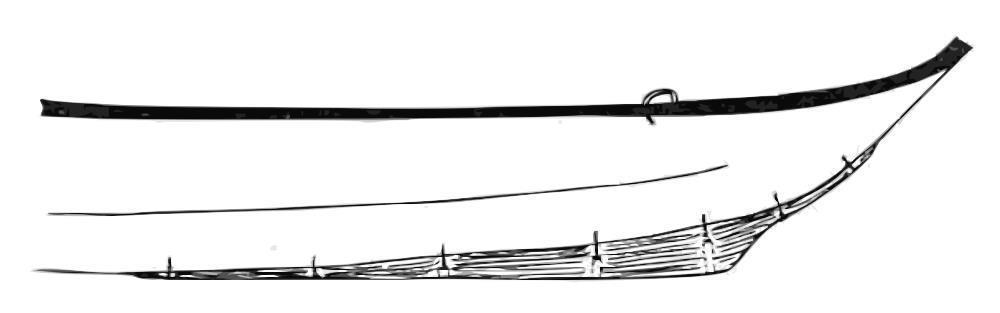
In my opinion, a skeg is better than a rudder. A skeg is simple, robust and can be permanent or removable, as seen on the picture. The removable version of the skeg has the advantage that you can switch between a kayak that is more maneuverable and a kayak that more faithfully stays the course. A large skeg can be approximately 10 cm deep and 30 cm long. It should be placed 20-25 cm behind the main bend of the keelson. Make the skeg from hardwood, and make sure that the mountings are solid.
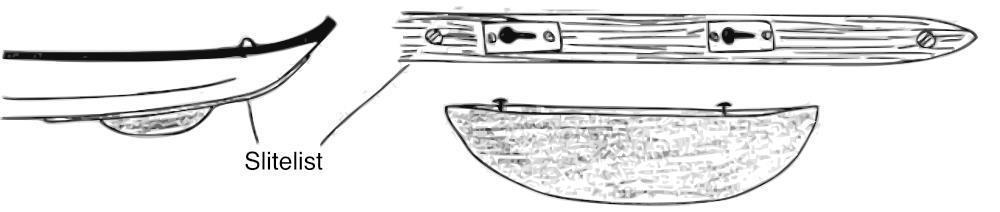
Fixed skeg
In my opinion, the best solution is a fixed skeg resembling an expanded anti-abrasion strip. This has the advantage of being simple, robust, as well as protecting the kayak against abrasion. It will be worn down over time and must be replaced every few years.